Appropriate Burners and the "Art of the Deal"
It was not uncommon for burners to be replaced on lamps over time. As burners became worn or broken, they were often replaced with any burner available at the time. Many early lamps are not found with an appropriate period burner. This is particularly true of fluid burning and whale oil lamps. Many fluid and whale oil lamps were "converted" to burn kerosene, and the original burners set aside. Early, and correct period, burners add significant value to a lamp. A decision to purchase a particular lamp should include some consideration to the overall completeness and correctness of the component parts. A reasonably priced lamp with an early burner would be an excellent buy. Conversely, a pricey overlay lamp with an awkward-looking Queen Anne burner (not appropriate for the lamp) would merit further consideration, as the burner would account for roughly $10.00 of the purchase price. The same lamp with an early Jones burner (easily worth $75.00 or more), would be a more attractive purchase, all other factors considered being equal. In the end, the decision to buy a lamp might be made without regard to the trimmings - it all depends upon the tastes and collecting habits of the collector.

Take Care of your Old Chimneys
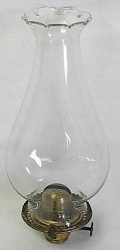 |
Old petal-top lip chimney.
|
Old chimneys add authenticity and value to any lamp. Since many old chimneys were hand-made, the tops are often hand worked with crimping or petals of varying proportion. There are imperfections in the glass itself - straw marks, bubbles, etc. - that add charm and character. If you plan on burning your lamps, it may be wise to use reproduction chimneys. Fancy old chimneys are relatively expensive, and are increasingly more difficult to acquire. Additionally, many sizes of lip or flange chimneys are almost impossible to find. While the risk of breaking them may be slight to moderate, one must ask "How easily could I replace this item?" and "At what cost?" For more than casual use, it may be prudent to replace your lip burner with one for which reproduction chimneys are readily available. If you decide to use an old chimney, a few precautions are in order:
Make sure the chimney is clean. Dirty chimneys can cause uneven heating that could cause the chimney to crack, or even shatter.
Wick maintenance is important. Keep the wick clean and trimmed to produce a nice, even flame. It will produce a better light, and provide a more even heat distribution, especially to the sides of the chimney.
When you initially light the lamp, keep the flame low. This will allow the chimney to gradually warm up. After a few minutes, the flame can be adjusted to the desired height. Remember that rapid changes in temperature are the enemy.
Make sure that chimneys that are oval-shaped in cross-section are aligned properly in relation to the flame. The long axis of the chimney should be parallel to the wick.
Be certain that the chimney does not fit into the burner too tightly. This is especially true with Aladdin chimneys which "twist & lock" into the gallery, and lip chimneys which are secured with a set screw. Tighten the screw just tightly enough to secure the chimney in place without over-tightening. As the chimney is heated, it expands - it needs a little room to accomplish this.
Brass or Not Brass? That is the Question . . .
It is always a good idea to carry a small (albiet strong) magnet with you when you're in the marketplace. Brass, bronze, and copper are non-ferrous. That is to say thay contain no iron and a magnet will not stick to them. Lots of old lamps have been painted over at some point in their long life. A magnet can help identify the underlying metal, or at least rule out some of the possibilities. I have found many hanging lamp frames and bracket lamps covered in thick, gold or black paint. Some of the frames are merely painted steel (or cast iron) and a quick check with your magnet will identify this. Others could be solid brass. You will also find many brass-plated lamp components. This could have been done to add strength or just to save on manufacturing costs. Check plated items carefully for excessive wear. Some collectors prefer the "rustic" look of a worn finish, but if your intent is to polish the item, the worn places will become painfully evident.
Sick Glass? Drink plenty of fluids . . .
"Sick glass" is often characterized by cloudiness or a light etching or staining of the surface. If this condition is a result of accumulated dirt and grime, or minor mineral deposits, it can often be cleaned. More severe conditions cannot be corrected by cleaning. If the surface of the glass has been abraded or eaten away by chemical process over the years, you're probably going to have to live with it. There are a score of "home remedies" that work to some extent or another, but you really cannot repair this damage to the glass surface by cleaning it. Some of these remedies can actually make the condition worse! Also beware of "oily" glass when you purchase it. Buy from a reputable dealer. Don't be afraid to ask that the item be cleaned before you buy it. If the dealer refuses, it may be best to pass on the item. Unscrupulous dealers occasionally hide the condition by lightly oiling the surface of the glass. It looks swell until you take it home and clean it. Once it dries, the cloudiness magically appears!
A Clean Burner is a Happy Burner
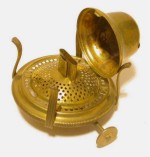 |
A properly cleaned burner.
|
Routine burner and wick maintenance is important if you intend to use your lamp. Efficient combustion will be hindered if the the burner is dirty and if the wick is not properly maintained and trimmed. Kerosene or lamp oil deposits on the burner trap dust particles. The burner body, especially the perforations, must be cleaned periodically to prevent clogging and promote proper air flow. Wiping or dusting will generally accomplish the task, but occasionally, a good cleaning in a dishwashing detergent will remove most of the accumulated dirt, grime, and oil residue. A properly trimmed wick will burn more efficiently and give a more consistent light with less flickering. Trimming evens up the surface and removes the charred portion of the wick. Flat wicks can be cut straight across with a sharp pair of scissors. I also "nip" the corners off at a 45 degree angle. This produces a more controlled flame. I use the same technique for re-wicking a burner. Start with a clean cut with trimmed corners. Frayed ends just make it more difficult to insert the wick into the wick tube.
Removing an Old Collar
Removing a damaged lamp collar can either be a quick and easy job or a complex, delicate operation. The key factor lies in what type of compound was used to attach your particular collar. Most early collars were affixed with plaster-of-paris or similar compound. Most of these are old, brittle and porous. In this case, all that is often required is a day or two soaking in water to soften the plaster. Simply invert the lamp in a container of warm water and wait. I often use dental picks to help loosen the plaster from inside the collar and if the collar is split, I poke around in through the crack at the plaster beneath.
Sometimes this method isn't successful. If the collar has been repaired in more recent times with epoxy or other "hi-tech" adhesives, they will not be affected by soaking in water. If you are daring, you may try to cut the collar into smaller pieces with a small metal cutting blade (by hand - don't use a reciprocating or jig saw as they cause too much vibration) or a high-speed hobby tool (Dremel�, RotoZip�) with a fine cutting wheel. With a steady hand and some luck, you can slice through the thick portions of the collar, such as the shoulder of the collar, then carefully peel away the smaller parts like you were opening up an old-style sardine can using needle-nosed hobby/craft pliers.
Extreme care must be taken when using any mechanical means so as not to damage the glass fount beneath - you always run the risk of shattering the fount. Whatever method you choose, be patient and use caution. Protect the lamp and yourself - wear eye protection when appropriate for the task.
Replacing the Lamp Collar
There are a couple of products which can safely be used to re-attach lamp parts such as collars for burners and filler caps, and to attach founts to their stems. While I generally use regular Plaster of Paris, ceramic tile grout (latex) has been recommended a number of times, but I have never tried it. Most collectors/restorers do not condone the use of epoxies and other "space age" adhesives as they are generally more permanent than the other options, and require more aggressive means to remove them, should the need arise.
Prepare the mating surfaces by removing all traces of old plaster and clean them thoroughly. Allow them to dry. Assemble everything you'll need, including some masking tape which can be used to hold the collar in position while it dries.
For plaster attachment, I mix a thick paste of plaster and water. Since this is quite white in color, you may wish to tint the plaster with ordinary water color paints - yellow and a bit of brown will give the plaster an aged look - child's water colors work well as you don't need much pigment to tint the batch. I don't have a magic formula, so you'll have to experiment a bit to get the color to suit your preference.
Apply a liberal amount of plaster to the inside of the collar, or to the neck of the lamp, or both. Carefully mate the two pieces together. Excess plaster will likely ooze out which you can wipe away with a damp cloth. Position the collar carefully so that it is both centered and level. Clean up any additional ooze, especially any that may have gotten onto the threaded portion of the collar - a couple of water-dampened cotton swabs work well for this. Finally, tape the collar in place and let it dry thoroughly. Once dried, you're ready for business!
Patina or Polish?
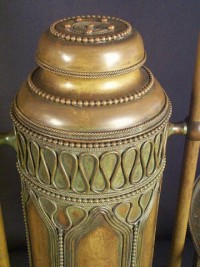 |
Tiffany student lamp with factory patina. Removing this would have a dire impact
on the value of the lamp!
|
I often receive questions regarding the finish on a lamp. "Is it best to
leave the patina, or can I polish my lamp?"
In many cases, this is up to the personal preferences of the owner. The
important thing to remember is that many old lamps were manufactured and
sold with antiqued finishes and factory-applied patina. This is particularly
true of Arts and Crafts and Tiffany-style lamps. Removal of the factory
patina on such pieces can diminish the value easily 50-60% or more.
If you are unsure if a finish is an intended result of the manufacturing
process or just the natural darkening and mellowing of the finish over
time, consult an expert in the field. Once you rule out factory finishes,
the ball is on your court. If you like the rich, mellow look of aged brass
or copper, then enjoy the lamp as it is. If you are after the "just out of
the box" shiny finish, then you may polish your lamp or have it
professionally stripped and burnished. If you want to preserve the
appearance, you may wax or lacquer the item to prevent it from tarnishing
for years to come.
There are many sources in print and on the internet regarding the care and
conservation of metal artifacts - take your time and do some research.
What about that ding?
Metal restoration is a tricky and complex process. Small dings and dents are signs of use and normal for any item with age. They add character and often tell a story about the item, altought this history is seldom documented. While most collectors would love to find pieces in pristine, unused condition, the reality is that because these were utilitarian items, they were used - not intended for display.
Dings and dents can be removed with metalworking tools - hammers, spoons and dollies, but it takes a great deal of skill to remove a dent and "get it right." For small, tight areas, it may be necessary to fabricate your own tools. Most dents are the result of a sharp blow to the object - often from being dropped. These dents are often crisp and clean and while they can be distracting, are often less obvious than a poorly restored piece. Novice dent removal often leaves the item in a worse aesthetic condition - the area having a stippled or dimpled effect, rather than the smooth appearance that had been the intent.
If you are serious about restoring the lamp yourself, I recommend that you practice and experiment on some scrap items before you tackle your lamp.
If you have any questions or suggestions for future tips, please email us.
Thank you.
 Hurleyville, New York 12747